原文地址:
http://www.members.shaw.ca/AlbertKallal/Ribbon/ribbon.htm
Some code to tame the Office Ribbon for Access
By Albert D. Kallal
Friday, April 23, 2009
The office ribbon is an amazing new interface.
The problem with the ribbon is that takes a lot of code to change the ribbon at runtime.
Solution: With my ribbon class you can enable, hide, change label text, or pictures of a button with great ease and very little code.
This ribbon class allows you to use the simple "old style" syntax to enable, hide, or change the text of a button.
eg:
meRib("Button1").enabled = true

meRib("Button1").label = "this is the new text for button1 on the ribbon"

meRib("Button1").picture = "HappyFace.png"
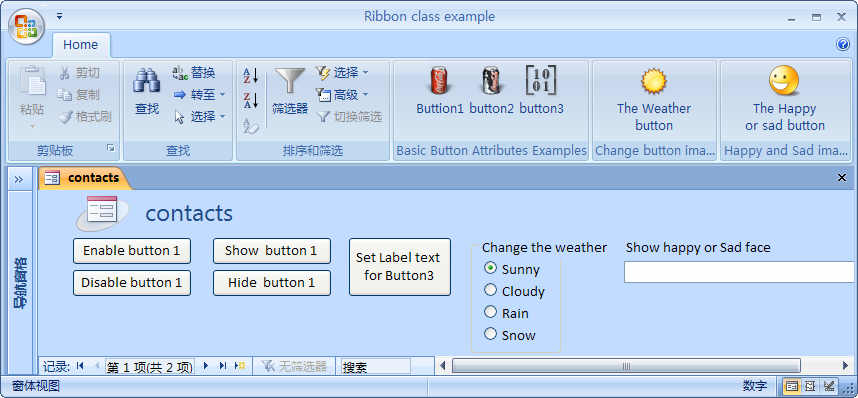
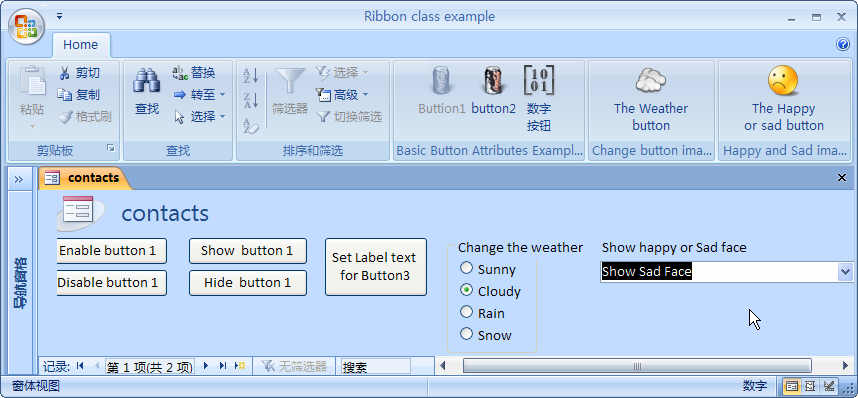
In a hurry? Just want to try this? Download and run the access sample here ribbon class 2007 example - link here
Just un-zip the above into a folder, and run it (don't run the accDB from inside of the zip, it will not work). You need to place the above unzipped files in a trusted location or set macro security in access to low to run this sample. Even if you don't plan to write any ribbon code the above sample has a demo form in which you can have some fun and see this ribbon system of mine in action. Have fun!
Ok, for the rest of us that want see how this works, and how to use in in your applications, read on.
In the past when I used custom menu bars in Access it was easy to write code to enable, disable, or hide those menu options.
Typical menu bar code would look like:
 If clsTour.lngResID <> 0 Then

    ' active tour, enable tour options

    CommandBars("GuiTourAsk").Controls("Tour Settings"). _

            Controls("Edit Tour Options").enabled = True

 End If
With my new ribbon class, the above code becomes:
 If clsTour.lngResID <> 0 Then

    ' active tour, enable tour options

    meMyRib("Edit Tour Options").enabled = True

 End If
Note how the above allows a similar syntax to previous use of command bars. The design of my ribbon class is such that conversion of previous code projects with menu bars can now be easily written to use the ribbon. I now write LESS code with my ribbon class then what I had in previous versions of access with menu bars!
meMyRib() is a custom function that automatic references the forms current ribbon setting, and thus eliminates the need to even type in the ribbon name.
This is just so simple and easy!
Why did I need this ribbon class?
Without this ribbon class then Enabling/disabling buttons on a ribbon is difficult since the ribbon system uses call backs.
Call backs are generally a new concept for most access developers. We all generally understand the concept of having our code call some other code. That "other" code might be some subroutines we write in code. Often our access code can might use other applications (automaton). In the case of automaton we might have code launch word or outlook. At the end of the day it is quite typical for us developers to "use" other code libraries. The popular PDF creating library that Stephan has for access is another great example of 3rd party code that many access developers have used. (note for access 2007, pdf ability is now built in and no 3rd party code is needed!).
With call backs you simply turn the above concepts upside down and the process is is reversed. This means the OTHER code library or application is going to call YOUR subroutines. This can be quite tricky because you have to write your code as such that it can be called over and over from that other application. It also means your code better be willing and able to run even when you not expecting it to be called. This typically means that your code has to be a little bit more robust than normal and your code must save the state of its variables BETWEEN each subroutine call.
The simple result of call backs simply means when the "Office Ribbon System" wants to enable/disable a button then the system will call YOUR CODE. Hence the ribbon system will ask your code is this button supposed to be displayed or not? In the old way, you told the menu bar to enable/display a control. Now your code has to respond to the ribbon. Your code has to maintain the state of those buttons. You can't ask the ribbon what is the label text of a button is, you have to ask your code! So, your code has to store that label text for EACH button that can be changed.
For every ribbon button that you as a developer want to enabled or disabled, it means that you have to write code and declare variables to hold the state and information about that one button. So, in addition to writing that one whole subroutine just for that one button, you also need to declare a variable that holds the state of "enabled" or "disabled".
With a menu bar we could go:
if commandbars("my Custom Menu").Controls("Delete invoice").Enabled = true then
code here display additional options for those can are allowed to delete the invoice.
So, with menu bars, when you set the value of a button in your application you could then EXAMINE the status of that control. In theory this means that menu bars actually could store state values. In fact we as developers often used this feature of menu bar. With the ribbon, we can't do the above.
My class ribbon object restores the above process for you. And, it takes care of the whole above process of managing all of the ribbon values. This means you can once again test and use with the state of a button freely throughout your code. The above code example would become:
if meRib("Delete invoice").Enabled = True then
code here display additional options for those can are allowed to delete the invoice.
The above code is simpler then the menu bar code, and it eases the transition of your menu bar code to ribbon code.
The 4 button attributes my ribbon class supports is:
   meRib("button1").Enabled =   True/false

   meRib("button1").Visible  = True/falsevalue

   meRib("button1").label     = "some text string"

   meRib("button1").image   = "my picture.bmp"  ' or for interal icons use "MSO.NameOf Internal ICON"
If you don't use my ribbon class to manage the above then you have to declare 4 variables to hold the values for JUST ONE button!
I don't think it takes much thought that if you have an application with just three or four ribbons and perhaps just 3-4 buttons on each ribbon, you now have about 16 buttons in total. That means we need 16 variables declared to just keep track of the visible/invisible property. If you need to change 3 attributes such as text, image and visible, then we get 3 x 16 = 48 variables. And if your code is not written in a reusable way then you wind up having to write sixteen subroutines to run for all of those attributes.
The above is the reason why I wrote this ribbon class object. This ribbon class creates and maintains and manages all of the variable creation for you. In a nutshell this means for each new additional button you add to your custom ribbon eliminates declaring any new variables. You don't even have to declare any new subroutines either. This class object manages this whole process and makes use of custom ribbons seamless for you.
So, to enable/disable a button on a ribbon, just go:
meMyRib("Button1").enabled = true/false
The above is it. Only line of code!
If the ribbon is NOT attached or part of the current form, then use:
meMyRibA("Ribbon Name","Button1").enabled = true/false
The only requirement to have all this magic done for you is to place the correct xml in the button you want to control. So, for any of the 4 possible attributes that my class supports (image, label, visible, enabled), you have to place some xml in that button that you want my class system to control for that particular button. Here is an example button that shows all 4 of the options enabled:
<button id="button3"

   size="large"

   getLabel="MyLabel"

   getEnabled="MyEnable"

   getVisible="MyVisible"

   getImage="MyImage" "tag="sunny.png"

   onAction="=Bt3()"

/>
In the above, the bold are the standard ribbon xml Call back declarations. In the above the blue parts are my custom functions that you have to use. Note that you never have to change or define the 4 blue options. You use those 4 callbacks over and over for each button. Keep in mind that for all buttons you create you could "always" add the above 4 call backs. However as a normal habit one should only add the callbacks that you need for particular button. So for example in the above button, if I only needed to enabled disabled, and to change the picture I need only the following
<button id="button3"

   size="large"

   getEnabled="MyEnable"

   getImage="MyImage" "tag="sunny.png"

   onAction="=Bt3()"

/>
So, the same callbacks are used over an over. So cut + paste this XML into each button you want to control. The only exception in the above of course is use of the "tag" option to set the start up image. You actually don't have to use the tag, and the button image would load up blank if you don't use the the tag setting as per above.
Note that the ribbon (and my ribbon class) also supports a method of setting custom icons for the ribbon from your hard drive. If your goal is to just a load some custom icons into the ribbon without need for changing the image at runtime with code then use the following syntax.
<button id="button3"

   size="large"

   getEnabled="MyEnable"

   image="sunny.png"

   onAction="=Bt3()"

/>
The above means you have to specify the "GLOBAL" image loading routine for all buttons in the ribbon heading as:
<customUI xmlns="http://schemas.microsoft.com/office/2006/01/customui"

    loadImage="CallBackLoadImage"

    onLoad="MyRibbonLoad">
Note that you cannot have both image and getImage attributes defined for a button. You must either choose image for a ONE TIME loading of image at ribbon startup, or you can choose to use getImage if you plan to have your code change the icon at program run time.
The following outlines the 4 attribute options for the ribbon class object.
| Option |
XML for button |
Use in VBA code |
| Enabled |
getEnabled="MyEnable" |
meRib("button1").Enabled = True

            meRib("button1").Enabled = False
State of control can also be returned as
if meRib("button1").Enabled = true then |
| Visible |
getVisible="MyVisible" |
meRib("button1").visible = True

            meRib("button1").visible = False
State of control can also be returned as
if meRib("button1").visible = true then |
| Label |
getLabel="MyLabel" |
meRib("button1").Label = "some text"
Text of control can also be returned as
msgbox meRib("button1").Label |
| Image |
getImage=&uot;MyImage" "tag="sunny.png" |
meRib("button1").Image = "Exit.bmp"
or for built in MSO image precede the
icon name with MSO. eg:, use
meRib("button1").Image = "MSO.HappyFace"
Text name of picture can also be returned as
msgbox meRib("button1").Image
Note that all custom images MUST be placed in a folder relative to the accDB file in a folder called ribbon. (see working example).
|
| Image |
image="CokeClassic.png" |
No VBA code needed here as we are NOT changing this image.
This option allows you to set a buttons image at load time to a built in icon, or an image from our ribbon "icon" folder. This option requires a "global" ribbon image load routine to be specified in the ribbon heading as follows:
<customUI xmlns="http://schemas.microsoft.com/office/2006/01/customui"

            loadImage="CallBackLoadImage"

            onLoad="MyRibbonLoad">
|
meRib assumes the current form. Use meRibA("ribbon name","button name") if you need to reference a ribbon other then the current forms ribbon. meRib will assume the global ribbon name if the current form does not have a ribbon set. Place all images you want to use in a folder called "ribbon" relative to the location where the accDB/accDE file will reside.
See the sample form on how the ribbons are loaded. The code in the "on-load" even of a form to load the ribbon is:
Call SetMyRib(Me)
The above code assumes that the ribbon to load for the form has the SAME name as the form. If not, simply use:
Call SetMyRib(Me,"name of ribbon")
Take a look at the sample form in the download. Just remember to leave the forms ribbon name setting in the other tab of the property sheet blank. My ribbon library does set the form's ribbon name with the above call. (the code needs to set this value to trigger the loading of the ribbon and thus get a handle on the ribbon).
Closing comments:
The above class object will allow the use of code to control and modify the ribbon at runtime with a very similar syntax to working with menu bars like we had in previous versions of access.
For more info on ribbons and use in ms-access the following site can't be beat:
http://www.accessribbon.de/en/index.php?Access_-_Ribbons:Ribbon_Attributes
Kallal@msn.com
 点击下载此附件